

Fuschia Hair looks like a confident, joyful choice in every pin and post you save. But the real question isn’t whether the colour suits your skin – it’s whether the colour will last past the first week of washing. Most guides skip what actually changes after you leave the salon: the sudden orange shift, the awkward fade at the hairline, and the moment your carefully styled pink suddenly clashes with your office lighting. Keeping that fuchsia hair colour maintenance consistent takes more than a special shampoo – and if you work in a professional setting, the bold hair color demands a strategy that goes beyond the dye itself.
If you love the energy of a vivid pink, you might also enjoy browsing magenta hair shades for a similarly striking effect. For those with darker base colours, fun hair colour ideas for brunettes show how to wear statement hues without full bleaching.
28 Fuschia Hair Styles That Stay Striking
Choosing the right cut matters as much as the colour. These 28 ideas pair fuschia’s boldness with shapes that support the colour’s life span and frame your features the way you want.
For the Sleek and Straight Set
Straight hair makes fuschia read as a single, saturated statement. The trick is enough layering to keep long lengths from looking flat, without over-texturising the ends and speeding up fade.
Long Layers with a Glass-Like Finish

by Pinterest
The long layered straight cut here relies on a sleek smooth blowout for its sharpness. Soft layers begin near the cheekbones and taper toward the ends, creating a slim, lengthening silhouette without heavy contouring. The high-shine saturation makes the fuschia appear liquid under natural light. Flat-iron only on dry hair after applying a dimethicone-based serum — it seals the cuticle and locks the colour in rather than baking it out. A slight natural movement at the tips prevents the cut from looking stiff, giving it a modern, edgy lift. Oval and heart-shaped faces benefit from how the layers pull the eye downward and elongate.
Soft Crown Volume with Subtle Layers

by Pinterest
This long straight style builds natural volume at the crown through a smooth blowout alone, without backcombing or heavy mousses. The front pieces fall softly around the face with minimal layering, creating an airy frame. Sleek lengths carry the opaque fuschia evenly under bright overhead light. Avoid conditioner on the roots the first week after dyeing — excess moisture lifts the cuticle and pushes out pigment right along the hairline where it catches everyone’s eye. Heart-shaped faces will appreciate how the soft front sections narrow the forehead without the commitment of bangs.
Side-Swept Layers with a Tousled Edge

by Pinterest
A deep side part pushes the front section across the forehead into a soft side-swept fringe that blends into long, slightly tousled layers. Chunky lighter pink streaks break up the fuschia base, creating dimension that shifts under different light. The texture stays smooth but not flat, carrying just enough movement to avoid an over-styled feeling. When the colour looks flat by day three, spritz a mix of semi-permanent dye and water onto dry hair — it revives the chunky highlights without triggering a full wash that bleeds pigment everywhere. Diamond face shapes will like how the sweep draws attention to the cheekbones.
Feathered Layers with an Inward Curve

by Pinterest
Long feathered layers open around the cheeks and jawline, with front pieces tapering softly toward the chin. The ends bend inward on a round-brush blowout, adding polish without stiff curls. Subtle volume at the crown and a glossy finish keep the shape refined. Direct the blow-dryer airflow downward along the hair shaft every time — it smooths the cuticle and slows how fast the pink washes out, especially from the more porous top layer. I cut before product every time: the shape does more for movement here than any texturising spray could. Oval and square faces take the elongating effect well.
Cascading Layers with a Soft Feathered Finish

by Pinterest
Long cascading layers sweep away from the face, building an elongated frame that softens the cheek and jaw area. The ends are feathered, so the colour transitions to a diffused edge — an useful cushion as fuschia inevitably starts its fade. A smooth blowout and a slight inward bend through the lengths give the hair a fluid, almost weightless appearance under bright salon lights. When the ends start to fade faster than the mid-lengths, apply a colour-depositing mask only to the last three inches — dry ends grab pigment aggressively and can turn patchy if you treat the whole head. Square faces benefit from the soft break at the jawline.
Black-to-Fuchsia Side-Swept Streaks

by Pinterest
A deep black base anchors vivid fuschia-magenta highlights streaked through the lengths, creating a high-contrast look that stays readable even as the pink begins to shift. The side-swept fringe and feathered ends soften the multi-tonal placement, while a sleek smooth finish keeps the colour sections crisp. With dark roots, you can stretch salon visits longer — the regrowth blends instead of announcing itself. Long layers sweep across the forehead and cheekbones, making this cut ideal for oval and square faces that can carry a stronger side part without losing balance.
Hot Pink Feathered Layers

by Pinterest
Long layers swing around the face with soft angled pieces that slim and contour the cheeks. The deep fuschia base gets lifted by hot pink highlights placed through the feathered ends, which catch the first hint of brightness under any light. A smooth blowout and subtle volume at the crown keep the look polished without excess weight. Flip your head upside-down for the last two minutes of the blow-dry — it sets the root lift with air, not powder, so you avoid products that can stick to freshly dyed strands and dull the saturation. Oval and square faces will get the most from the angle of these face-skimming layers.
When Waves Do the Heavy Lifting
Waves soften fuschia’s intensity and create dimensional pockets where the colour shifts from deep pink to a glassy sheen. The key is a layering pattern that encourages movement without sacrificing the length needed to anchor the vivid tone.
Cascading Waves with a Plum Melt

by Pinterest
Long cascading layers and soft loose waves build a voluminous silhouette that moves from deep fuschia plum at the roots to magenta-violet at the ends. The high-shine finish amplifies the multi-tonal melt, making the waves appear nearly three-dimensional in daylight. Twist sections around a curling wand, then let them cool completely before touching them — the dye sets better when the hair cools undisturbed, which adds a day or two to the vibrancy before the next wash. Oval and heart-shaped faces will find the long, face-softening movement flattering as it gently contours the cheeks without closing in.
Tousled Side-Parted Waves

by Pinterest
Loose, undone waves and a deep side part build high volume at the root while the soft, airy layers sweep around the cheeks and jawline. The undone texture keeps the deep fuschia burgundy from reading too serious, adding a relaxed, lived-in feel inside a car in natural daylight. Use a salt spray on the mid-lengths only — too high and it clings to the roots, where it can pull the colour out faster during the next rinse. Diamond and heart-shaped faces will like how the deep side part creates a curtain-like movement that narrows the forehead and opens up the eyes.
Dimensional Waves with a Side Part

by Pinterest
Dimensional colour blocking runs through long layered waves, with deep plum lowlights adding depth behind the bright fuchsia magenta surface. A subtle side part and high-shine finish let the different tones shift as the hair moves — more complex than a single-process colour. Clear eyeglasses pair with the look and add an intellectual contrast. If you wear glasses every day, choose frames that don’t touch your temple hair — constant friction there wears the cuticle thin and causes patchy fading exactly where people notice first. Diamond face shapes benefit from the side-swept front section softening the cheekbones.
Hot Pink Highlighted Waves

by Pinterest
Soft loose waves and long blended layers carry vivid fuchsia magenta with hot pink highlights placed through the ends. The dimensional variation means the colour reads differently from every angle, pulling brighter on the outer curves of the wave and deeper in the troughs. Textured ends keep the finish from looking overly done. Air-dry the hair until it is eighty percent damp, then use a diffuser on low heat — the reduced direct heat exposure preserves the pink molecules far longer than a full blow-dry every wash. Square faces get the softening benefits of waves that fall below and around the jaw.
Glossy Waves with Subtle Face-Framing

by Pinterest
Soft loose waves start below the cheekbones and flow into glossy, dimensional colour that mixes deep fuchsia burgundy with lighter flashes at the tips. The crown stays smooth, concentrating the movement toward the ends for a balanced, polished silhouette under salon lighting. A weekly chelating shampoo is non-negotiable if your tap water carries high mineral content — copper builds up and turns the burgundy tones a brassy orange that no purple product can reverse. Oval and square faces will appreciate the gentle layers that open at the lower half without adding width around the cheeks.
Layered Waves with a Root Shadow

by Pinterest
Vibrant fuchsia magenta with a darker plum root melt creates lived-in depth that extends the time between salon visits. Soft loose waves and layered ends add volume, while the face-framing sections soften the sides around the cheekbones. The high-shine finish keeps the colour looking fresh even under indoor office lighting. Sleep on a silk pillowcase for the first three nights after colouring — the reduced friction stops the darker root pigment from wearing away at the back of the crown, which is where the root shadow breaks down fastest. Oval and square faces can wear this shape without the bulk that thick waves sometimes bring.
Center-Parted Waves with Face-Framing

by Pinterest
A center part divides long layered waves that sweep around the cheeks with a curtain-like effect. The soft loose texture and glossy finish let the vivid fuchsia magenta appear almost shiny in its saturation, catching warm daylight through a car window. Small hoop earrings and a nose stud add an edge that complements the colour’s playfulness. When you wash, flip your head upside down and rinse with cool water — it distributes the water pressure evenly so the colour does not wash out in a single heavy stream down the part line. Oval and diamond face shapes will see the center opening add symmetry and lengthen the face.
Shorter Lengths and Creative Shapes
Shortening the length or pulling the hair up shifts the focus to the face and the colour’s high notes. These cuts and styles make fuschia feel deliberate and fresh, even in settings where super-long pink hair might feel too much.
Half-Up Braid with Blunt Ends

by Pinterest
A sleek smooth finish dominates the top section, which is pulled into a half-up braid at the crown. The rest falls long and straight past the face, with minimal layering and blunt-looking ends that make the vivid fuchsia appear dense and uninterrupted. Soft front sections can contour the cheeks when left loose. Pin the section while the hair is slightly damp with a leave-in conditioner — it sets the shape and prevents the front pieces from puffing up as the day goes on, which can expose more faded root colour. Oval and heart-shaped faces benefit from the braid pulling the eye upward and creating vertical lift.
Shoulder-Length Waves with a Side Sweep

by Pinterest
Soft loose waves and layered ends sit at the shoulders, with a side part and a long side-swept front section contouring the cheeks. The voluminous body and glossy finish let the vibrant fuchsia magenta reflect light evenly, while the layered ends prevent the bluntness that can make shorter hair look heavy. A silk scrunchie at night keeps the waves from falling flat — gather into a loose, high pony and the bends will hold until morning without needing to re-curl. Square and heart-shaped faces get the most softening from the jawline-hugging layers and the off-center part.
The Blunt Lob with a Glass-Smooth Finish

by Pinterest
This shoulder-length blunt lob keeps a clean perimeter with a slight inward bevel at the ends and subtle face-framing layers. The sleek, glass-smooth finish makes the deep fuchsia burgundy with plum-violet undertones read like poured enamel. Multi-dimensional tonal blending adds depth without visible streaks. Use a paddle brush during the blowout to press the cuticle flat — the tighter the cuticle, the longer the colour molecules sit in the strand without washing out sideways. Oval and square faces can wear this cut straight and still see the soft front sections angle gently to slim the jaw area.
The Glass-Smooth Magenta Lob

by Pinterest
A blunt lob with a glass-like smooth finish and even ends gives the vibrant fuchsia magenta a high-shine polish, almost lacquered against a soft pink background. A subtle face-framing taper at the front softens the jawline while keeping the overall line clean and modern. The single-process vivid colour looks dense and uninterrupted. Rinse your lob with cold water after every wash — shoulder-length hair sits closer to the neck and back, so the colour transfers to clothing faster if the cuticle is not fully sealed shut. Oval and heart-shaped faces will find the straight perimeter elongating and the front taper flattering.
Textured Shoulder Waves

by Pinterest
Soft loose waves and textured layers sit at the shoulders, with a side part and voluminous body that lifts the roots. Long layered pieces sweep around the face and soften the jawline, making the vivid fuchsia appear bouncy and light. The glossy finish keeps the texture from looking dry. Twist small sections around a wand but leave the very ends straight — this prevents the colour from fading in a visible ring at the bottom, which is where shoulder-length cuts show the most wear over time. Square and oval faces get the most movement from the layered sides that stop the cut from turning boxy.
The Sleek Curly Puff Ponytail

by Pinterest
A smooth, slicked-back crown pulls the hair tight into a low curly puff at the nape. The defined curl texture left loose in the ponytail contrasts with the high-shine front, giving the vibrant fuchsia pink two different light-catching surfaces. Small stud earrings and a silver chain necklace add an unfussy finish. Apply edge control with a toothbrush, not your fingers — the precise placement keeps the hairline crisp all day and stops the product from migrating into the ponytail and dulling the colour there. Oval and square faces get a sculpted lift from the pulled-back sides that emphasise the cheekbones.
Half-Up Twisted Waves

by Pinterest
A half-up twist at the crown secures the top layer while soft loose waves and long blended layers fall over the shoulders. The dimensional colour melt from darker roots to brighter ends adds vertical movement that works with the twisted section. Soft face-framing pieces contour the cheeks and jawline. Mist the twisted section with a lightweight hairspray before you step outside — the extra hold prevents frizz from pulling the short pieces out of the twist, keeping the style deliberate rather than messy by lunchtime. Oval and diamond face shapes will appreciate the gentle face-skimming pieces that draw the eye downwards.
The Face-Framing and Textured Edit
When you want the colour to interact with your texture and the shape of your face, these styles bring the movement and the framing that turn a flat pink into something with dimension and personality.
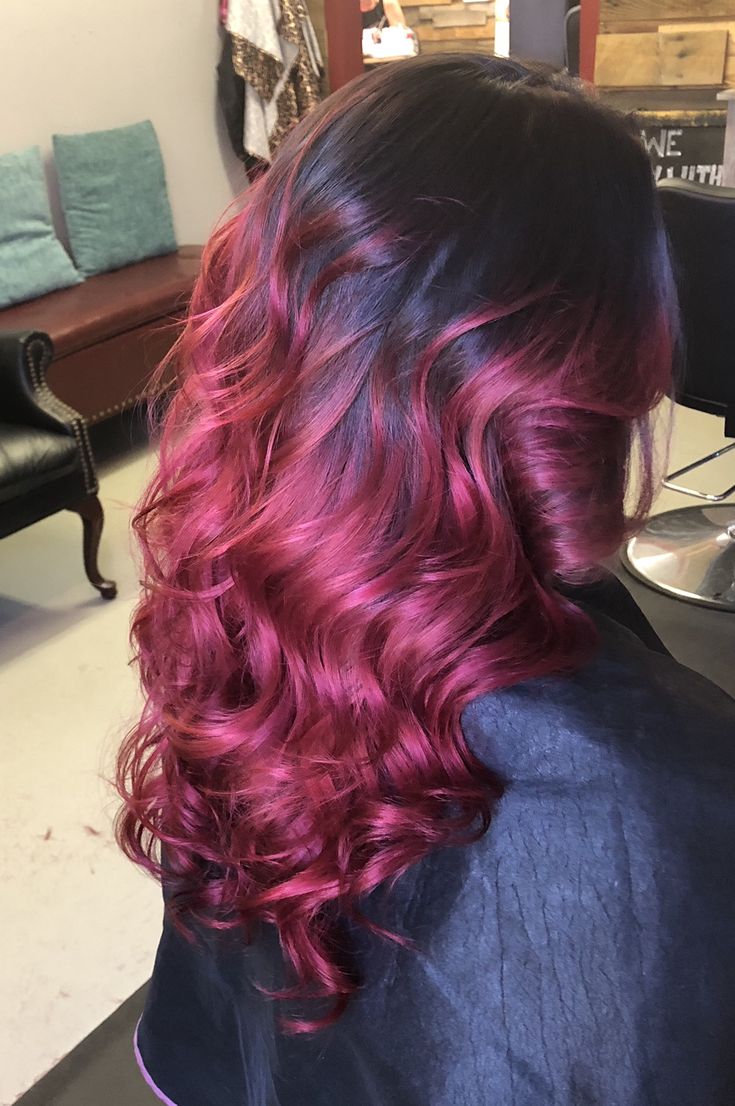
Balayage Curls with a Dark Root Melt
by Pinterest
Loose voluminous curls and a soft layered shape carry a colour melt that starts with deep plum at the roots and transitions into fuchsia magenta at the ends. The side-parted styling adds volume, while the glossy finish makes the curls look healthy and full. Finger-roll each curl while it is still warm from the wand, then let it cool in your palm — the dye sets into the curl’s shape this way and reflects light from the curve, extending the high-shine look by days. Oval and square faces will like how the long layers and curled pieces create soft framing without closing in the face.
Side-Swept Waves with a Root Melt

by Pinterest
Long side-swept front layers curve around the face and blend into soft voluminous waves. The dark root melt grounds the vibrant fuchsia magenta and adds depth at the regrowth, making the transition out of the colour look intentional. A glossy finish and side part sweep the hair into a flattering, curved silhouette. Reapply a clear gloss at the salon every four weeks — not to change the colour, but to re-smooth the cuticle so water has nothing rough to catch onto and pull the dye through. Heart-shaped faces can use the side sweep to balance a wider forehead and bring focus to the eyes.
Curtain Bangs with a Soft Blowout

by Pinterest
Long curtain bangs and face-framing layers sweep across the cheeks, opening the face while the rest falls in soft blowout volume with feathered ends. The subtle inward curl at the tips adds polish, and the smooth glossy finish lets the fuchsia magenta with hot pink and plum undertones shimmer. Train the bangs to split by clipping them back at night, not by over-brushing them forward — the less friction on the bang area, the longer the colour stays fresh along the face where it fades first. Oval and square faces will find the curtain layers soften the jaw and lengthen the face.
Curtain Bangs with Voluminous Blowout Waves

by Pinterest
Voluminous blowout waves and face-framing curtain layers start high on the crown and sweep across the cheeks, with rounded ends that keep the shape soft. The multi-dimensional colour placement — fuchsia magenta with deep plum lowlights — adds richness that shifts as the waves move under indoor natural light. Blow-dry the bangs in the opposite direction first to get lift, then flip them back to their natural fall — this prevents the part line from becoming a stripe of flat colour that no pigment can hide. Oval and square faces benefit from the curtain layers that narrow the forehead and soften the cheekbones.
Side-Swept Glossy Waves

by Pinterest
Long side-swept front pieces and layered waves soften the entire face, with a voluminous body and glossy finish that makes the vibrant fuchsia magenta look rich and reflective. A smooth blowout at the crown adds lift without teasing, and the side part creates a diagonal line that slims. Use a wide-tooth comb, not a brush, on these waves between washes — the comb separates the wave pattern without scraping the cuticle and creating little white-looking patches of stressed hair. Oval and square faces will appreciate the asymmetry that breaks up the jawline and draws the eye upward.
Undone Waves with a Center-Back Part

by Pinterest
Loose, undone waves and textured layers fall from a center-back parting, with slight frizz adding volume and a natural, air-dried feel. Soft layered pieces skim the face and blend into the lengths, creating a relaxed, mirror-selfie look. The vibrant fuchsia pink takes on an almost matte effect without heavy gloss products. Scrunch the hair with a cotton tee, not a towel, right after washing — terry cloth lifts the cuticle and introduces friction that speeds up the pink’s fade by a full day. Oval and square faces will like the casual width that the undone texture brings to the cheek area.
Center-Parted Voluminous Waves

by Pinterest
Soft loose waves and a center part create a symmetrical, high-impact look that lets the vibrant fuchsia magenta with hot pink and violet undertones take full attention. Long blended layers and voluminous body keep the silhouette from falling flat along the sides, while the high-shine finish catches every light source. Apply an UV-filter spray before any time in the sun — center-parted hair takes the most direct exposure at the part line, and the colour can pale into a muddy white-pink there before anywhere else. Oval and heart-shaped faces get the most lengthening from the even fall of these waves, which open the face cleanly.
The Undertone Trick: Cool vs. Warm Fuschia Hair
Base chemistry matters more than the bowl shade: Most fuschia hair dyes are built on either a blue-violet backbone (cool) or a red-magenta backbone (warm). A cool, blue-based formula stays true on skin with pink or cool undertones and fades to a silvery lilac that looks deliberate. A warm, red-based version flatters yellow or olive undertones but degrades into peachy copper if the base pigment bleeds unevenly. Ask your colorist to show you the tube — if the undiluted dye looks almost purple, it’s cool-leaning; if it glows like a raspberry liqueur, it’s warm.
Face shape and where the colour hits: How fuschia sits against your skin changes how your bone structure reads. On a round face, a cool fuchsia with a deeper root smudge creates vertical contrast, drawing the eye up and elongating. Heart-shaped faces benefit from concentrating the brightest pieces around the lower lengths, away from a wide forehead — a soft money piece that starts at the cheekbone keeps balance. A square jaw softens when the fuchsia leans warm and hits at collarbone rather than chin, because the magenta undertone diffuses the angular line. Oval faces carry either version, but the fade path matters: a cool fuchsia that turns pastel can wash out an olive complexion, while a warm one gone salmon tends to harmonise.
Test without commitment first: Tape a sheer fuchsia chiffon swatch or a lipstick your skin tone onto your collarbone and photograph yourself in natural daylight, then under office fluorescents. If the colour makes your teeth look yellow or darkens your under-eye area, the undertone is off. The same happens when fuschia hair sits at your hairline — it will pick up every shadow on your face. I’d argue this test is more honest than holding a swatch to your cheek in salon lighting, because it mimics how people actually see you in real life.
Lighting rewrites the colour: A true cool fuschia can look electric magenta in sunlight but flatten into dusty mauve under warm indoor bulbs. Porosity after bleaching magnifies this shift. If you’ve only ever seen your colour in one light, you risk thinking it turned brassy when it’s just the bulb. Check your hair in a window reflection and then in a lift to see the range. L’Oreal Paris technical notes on fuschia hair colour mention this chameleon effect as a known factor — the red and blue molecules reflect differently at varying light temperatures.
Choose the fade, not just the fresh colour: Most shops let you see the fresh swatch. Ask to see the “fade swatch” — the exact tone the formula becomes after three, six, and ten washes. A cool fuschia drifts toward pastel lavender, which pairs well with a soft pink grown-out look. A warm version moves honey-pink to salmon, which can look deliberate if you love a peachy sunkissed effect. Decide which fading sequence you’ll actually live with for the weeks between appointments.
The Fading Timeline: Pink to Peach in 14 Days
Wash 1–3 is bleed central: Fresh fuschia hair sheds excess pigment like mad. The first three shampoos tint your fingernails, your nape, and any light-coloured collar you own. This isn’t a botched job — direct dyes sit on the hair shaft and simply release what can’t bond. From day one, wash with a sulfate-free cleanser in the coolest water your scalp can stand, and skip conditioner at the roots. That simple switch cuts the neon runoff by half.
The orange-ification point hits around wash 5: As the outer fuchsia layer fades, the bleached undertone peeks through. If your pre-lightened base was warm (yellow-gold), you’ll suddenly see salmon or coral swallowing your pink. To delay this, have your stylist apply a clear gloss sealant right after the colour — it smooths the cuticle and locks pigment in. No pigment in the gloss means no unwanted tint shift.
Tap water can turn your hair brassy overnight: American cities with high copper in the mains water — common in older plumbing — oxidise fuchsia into an orangey straw. A weekly chelating shampoo (not purple shampoo, which turns pink greenish-grey) strips away mineral buildup. If you’re on well water, a filtered showerhead is non-negotiable; the fade accelerates without it.
Heat styling cooks the colour out: Flat irons and curling wands above 300°F lift the cuticle and bake the dye right off the strand. If you must use heat, apply a dimethicone-based serum first to form a flash barrier. Air-drying extends vibrancy by at least five days between touch-ups, and you’ll see less patchiness at the ends. I’d argue that learning a no-heat wave method (like robe curls) saves you more in colour maintenance than any product ever could.
Week 3 is the colour correction signal: By day 21, fuschia often looks tired — dusty rose instead of jewel-toned. That’s when a homemade colour-depositing conditioner (two parts conditioner, one part semi-permanent fuchsia dye) resets the hue. Apply it to dry hair for 20 minutes; porous ends grab the pigment more evenly than when the hair is wet. This one step pushes your salon visit back another ten days.
Professional Settings: Making Bold Hair Work for You
The shoelace theory: Fuschia hair is a single detail, like bright shoelaces in polished oxfords. When the rest of your grooming is deliberate — a clean ponytail, sleek parting, not a flyaway in sight — the colour reads as creative professional, not casual experiment. The contrast between wild colour and severe styling is what makes it work. I’ve seen women in boardrooms with electric hair and a razor-sharp bob get compliments on their “statement” while someone with the same dye and messy waves gets side-eye.
The clip-back strategy for high-stakes days: On a day with a client presentation or interview, don’t hide the colour — control it. Gather the front sections and pin them into a low chignon, leaving the fuchsia to flash only at the nape and crown. This chignon trick creates a surprise reveal that signals the colour is intentional, not accidental. It also keeps the line soft and professional when you’re seated.
Name your shade strategically: In traditional fields, the words you choose frame others’ perception. Call your fuschia hair “deep magenta” or “berry tone” in law or finance settings — those labels align with classic shades like burgundy or mahogany, which people already accept. In creative industries, “electric fuchsia” works. Saying it with authority before anyone asks can defuse misgivings.
A root shadow makes it look deliberate: A dark ash brown or cool black smudge at the regrowth line softens the contrast between your natural colour and the fuschia. It also buys you up to six weeks of grow-out before anyone notices roots. This transforms the look from home dye job to studio-grade balayage. Many women in face-framing layers galleries use the root shadow precisely to keep the colour anchored.
Deflect the “Is your hair… pink?” comment with ease: A simple “Yes — I’m trying colour this season, like a new pair of glasses” reframes the conversation. Never apologise; owning the choice prevents judgment. When you treat it as a fun, temporary experiment, others relax because they sense no defence needed.
Pre-Lightening Pitfalls: What Happens Before the Pink
Bleach bath over full bleach-out: Many assume platinum is mandatory for fuschia to pop, but a heavy bleach-out on dark hair (levels 3–4) leaves the cuticle so shredded that the dye grabs unevenly and fades in days. A bleach bath — lightener mixed with shampoo — lifts to a warm level 7–8, giving fuchsia enough lightness to read vivid while preserving enough protein to hold the pigment. L’Oreal Paris technical guides often recommend a clean, pale yellow canvas, never white, for direct dyes.
Warm base equals red reflection: If your pre-lightened hair has warm golden tones, the fuchsia will pull fiery and can reflect onto your skin, making fair or rosacea-prone complexions look perpetually flushed. Women with surface redness should ask for a cool, violet-toned blonde base (level 9 with violet undertone) before the pink goes on. This single choice removes the “sunburnt” effect that makes cool fuchsia clash with a warm canvas.
Bleach residue creates a hot root: If even a trace of bleach remains on the hair when the fuchsia dye is applied, it continues to lift the natural pigment, leaving a bright gold band at the regrowth. Your stylist prevents this by rinsing bleach until the water runs completely clear, then double-shampooing with a protein-based cleanser. Never skip the clarifying step after pre-lightening — it’s the invisible difference between a clean result and a patchy mess.
Olaplex can shift the tone: Olaplex No. 1 during bleaching is standard, but applying No. 2 after the fuchsia dye can pull the colour from cool to warm if left on beyond 5 minutes. The bond rebuilder interacts with direct dye molecules. Ask your colourist to keep the post-colour Olaplex treatment short, or swap it for a protein spray instead. I’d rather compromise one bond treatment than walk out with a muddy peach.
Strand test on the money piece, not the nape: The hair at your nape is less porous than the top layer, which faces UV and heat styling daily. Testing a strand near your part gives you the true read on how the dye will grab and fade where it matters most. A trendy money piece balayage placement mirrors this exact section — if the fuchsia looks right there, the whole head will follow.
Bonus: The 7-Day Color Lock Routine After Dyeing
Simple over stacked — that’s how I approach colour aftercare. A few well-timed steps keep fuschia looking deliberate, not desperate. Here is the week that changes everything.
First 24 hours: Do not wash your hair. Sleep on a dark silk pillowcase.
Cotton wicks moisture and pigment, leaving a faded patch at the crown by morning. A silk scrunchie looped loosely at the crown reduces friction without denting the shape. The pillowcase can later go into a separate hot wash — the dye lifts from silk less than cotton.
Day 2 wash protocol: Rinse with ice-cold water using conditioner only on the mid-lengths and ends.
Water below 20°C helps seal the cuticle, slowing dye loss dramatically. Massaging conditioner into the scalp can loosen fresh colour, so keep it well away from roots. Stop rinsing once the water runs pale pink — never clear; that would be over-stripping.
Day 3–4 refresh mist: Combine 3 drops of semi-permanent fuchsia dye with 2 oz of water in a spray bottle.
Mist it lightly over dry hair before you leave home. Porous ends absorb the pigment first, reviving the zone where fade typically creeps in. A fine fog is enough — soaking the hair undoes the seal you just built.
Day 5 style shield: Spritz a weightless UV-filter leave-in before any hot tool.
Fuchsia’s red molecules break down faster under UV than the blue ones, which is why bleached lengths can shift to a murky violet. A dimethicone-based spray forms a heat and light barrier. If you can skip the wand, do — patience now keeps the colour vivid for a few extra days.
Day 7 colour-deposit mask: Apply a fuchsia depositing mask, or your conditioner-and-dye blend, to dry hair.
Dry application forces the cuticle to drink in pigment rather than rinse it away. Cover with a shower cap and leave for 30 minutes, then rinse with cool water. This resets the tone for another full week without overloading the strand. If you want the pink to lean cooler, a dash of magenta hair dye in the mix shifts it away from peachy.
FAQ
Will Fuschia Hair stain my pillowcases and towels forever?
No. The heaviest bleed happens during the first three washes. Use old dark towels and pillowcases, then wash them in a hot bleach cycle and they’ll come clean. Avoid silk and polyester liners — those can retain a pink tint.
Can I go swimming with Fuschia Hair, or will it turn green?
Chlorine and copper-based algaecides in pools can strip pink into a straw-orange and may trigger a greenish cast. Soak your hair with clean tap water and coat it with a silicone-heavy leave-in conditioner before entering. Rinse immediately after and apply a chelating shampoo that week.
Will my grey roots look weird with Fuschia Hair?
Not if you plan for them. Pure white regrowth acts like a metallic root shadow, which many colourists now mimic. If you have more than 30 percent grey, ask for a subtle cool-beige root smudge — it blends the regrowth into the pink and stretches salon visits to eight weeks.
Do I have to wear different makeup with Fuschia Hair?
Yes, mostly on cheeks and lips. Cool fuchsia steals warmth from the skin, so swap peachy blush for a neutral beige or mauve. Coral lipstick can suddenly clash; choose a berry or sheer plum instead. It’s the fastest way to stop the colour from looking separate from your face.
Is it true that Fuschia Hair makes thin hair look thinner?
It can. Flat, vivid colour reveals the scalp more easily because there’s no dimensional shift to disguise it. Adding subtle dark burgundy lowlights under the fuchsia creates visual depth without changing the overall pink effect.
How long does Fuschia Hair last before I look like a faded mess?
With cold washes and the right care, a semi-permanent fuchsia stays vibrant for three to four weeks. After that, it eases into a pastel rose that many women actually prefer. The trick is designing the fade intentionally, not hoping it disappears. A colour-depositing conditioner once a week resets the hue whenever you want.
Where should I put the brightest pink on a round face?
Keep the most intense fuchsia at the crown and on the very ends, and avoid concentrated strips at the cheekbones. For round shapes, I’d place the pop inside the hair, not framing the face — think hidden balayage. Square faces do better with soft, blended strokes that break the jawline, while oval faces can carry a full head with a dark root shadow. To draw the eye downward, pair fuchsia ends with face-framing layers that kiss the collarbones.
